Setup Roku HDMI Cable: A Step-by-Step Guide
Setting up your Roku streaming device is a straightforward process that requires connecting it to your TV using an HDMI cable. In this article, we'll walk you through the steps to connect your Roku device to your TV using an HDMI cable and get you started with streaming your favorite content.
Understanding the Basics of Roku HDMI Connection
Roku is a media streaming device that allows you to access a wide range of streaming services, including Netflix, Hulu, Amazon Prime Video, and many more. To connect your Roku device to your TV, you'll need to use an HDMI cable. The HDMI cable is included with your Roku device, and it's designed to carry high-definition video and audio signals between your device and your TV.
When using an HDMI cable to connect your Roku device to your TV, you'll need to ensure that your TV has an HDMI port available. If your TV doesn't have an HDMI port, you may need to use a different type of cable or adapter to connect your device.
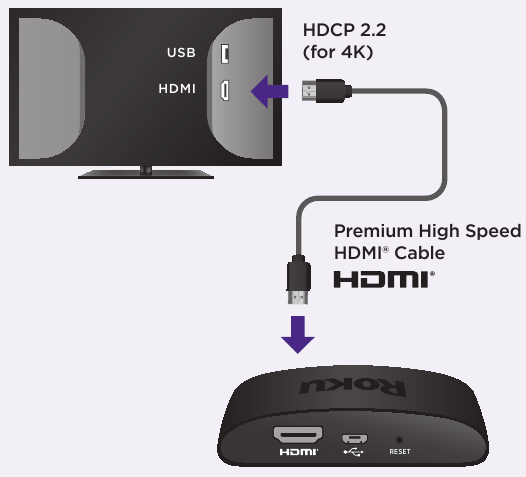
Connecting Your Roku Device to Your TV
Connecting your Roku device to your TV using an HDMI cable is a relatively simple process. Here are the steps to follow:
Locate the HDMI port on the back of your TV. Make sure it's not already in use by another device.
Take the HDMI cable that came with your Roku device and insert one end into the free HDMI port on your TV. Make sure it's securely seated.
Take the other end of the HDMI cable and insert it into the HDMI port on the back of your Roku device.
Turn on your TV and select the correct HDMI input channel to match the device you've connected to it.
Power on your Roku device.
Wait for the Roku device to complete its initial setup. This may take several minutes, depending on your internet connection.
Setting Up Your Roku Device
Once you've connected your Roku device to your TV, the final step is to set up your device. Here are the steps to follow:
Use your remote control to navigate to the setup menu on your Roku device. You'll see a series of prompts to complete the setup process.
Follow the on-screen instructions to complete the setup process. This may include entering your Wi-Fi password, selecting a language, and choosing your streaming services.
Once you've completed the setup process, your Roku device will be ready to use. You can begin streaming your favorite content and accessing various apps and services.
Troubleshooting Common Issues
While connecting your Roku device to your TV using an HDMI cable is generally a straightforward process, there are some common issues that you may encounter. Here are some troubleshooting tips to help you resolve these issues:
Check the HDMI cable to ensure that it's securely connected to both your TV and your Roku device.
Inspect the HDMI cable for any visible damage or fraying.
Try connecting your Roku device to a different HDMI port on your TV to rule out any issues with the port.
If you're experiencing audio or video issues, try adjusting the audio settings on your Roku device or TV.
Conclusion
Setting up your Roku device to connect to your TV using an HDMI cable is a straightforward process that requires several steps. By following the steps outlined in this article, you should be able to connect your device and get started with streaming your favorite content. Remember to troubleshoot any common issues that you may encounter and to check your device and TV settings to ensure that everything is properly configured.
")

")


![Why Does Roku Say No Signal? [New Fix for 2026]](https://static1.pocketlintimages.com/wordpress/wp-content/uploads/wm/2023/12/roku-device-setup-home-screen-1.JPEG "Why Does Roku Say No Signal? [New Fix for 2026]")
